|
|
 |
|
|
|
The Restoration of a
Distler Porsche
7500 Tin Metal
Model!
Scroll down to see a new addition!
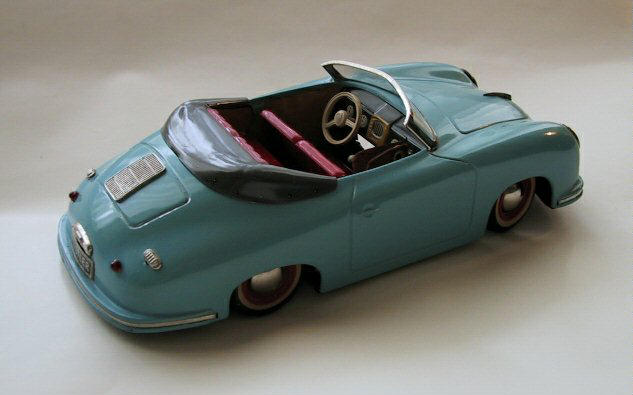 |
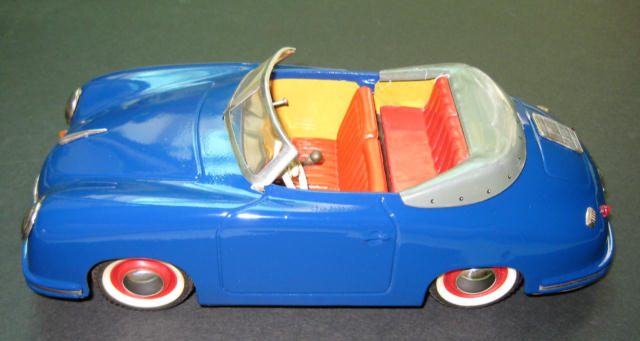
Example of a mint Distler Porsche. NOT the subject of this restoration! |
Distler Porsche Models:
The model above is a good example of an unrestored Distler Porsche Electromatic 7500. These battery powered tin metal models were made in West Germany in the early 1950's and later in Belgium, and in recent years they have become highly collectable. Mint boxed examples can bring well over $1,000.00. Rare colors and the Police model can bring as high as $3,000.00. Distler values are primarily a function of originality, condition, and certain rare colors. Because of escalating prices for high quality Distlers, collectors are increasingly turning to restoring these neat little cars. And that's what this website is all about: restoring a Distler Porsche Electromatic 7500. Below you will find a series of pictures and descriptions of the restoration process, and the completed model.
![]()
The Restoration:
The Distler picked for this restoration project was in pretty sad condition when first obtained. The paint was badly scratched, and there was surface rust on most of the bright parts. There were several major "dings" in the body and some of the parts were missing. To top it off, the electric motor didn't work and the battery area was badly corroded.
To begin the restoration, the model was completely disassembled. Removing the body from the chassis was the first step. This was accomplished by turning six (6) clips that hold the body to the chassis. These clips can be accessed from six 1/8 inch holes in the base plate, two at the front of the base plate, two in the middle, and two at the back. Use a small screwdriver not wider than 1/8th of an inch. Insert the screwdriver into the holes and turn to the left or the right. The clip will turn and release the body from the chassis. In some cases, it may be necessary to spray the clips with WD-40 or liquid wrench to release the clips.
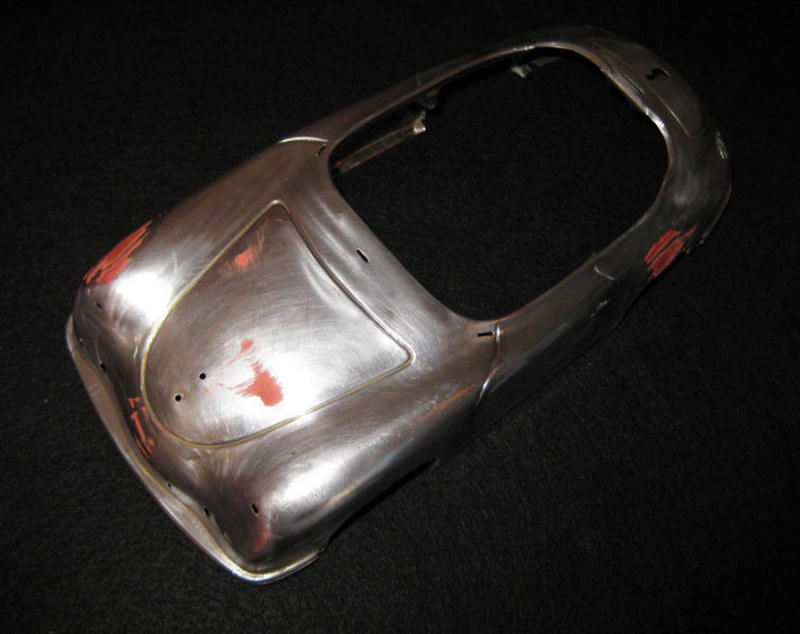
Next all the parts attached to the body were removed including the headlights and tail lights, windshield and frame, licence plates, deco strips and hood handle. The metal body was then stripped of paint inside and out. This was accomplished by using paint remover brushed onto the body, and sand paper. Every bid of original paint was removed. Numerous dents were first pounded out with a small roundhead hammer, and auto finishing putty was applied and sanded numerous times until all signs of the dents were gone. Finally, the body was primered inside and out.
All of the bright metal parts including the headlights, windshield frame, licence plate light, and deco strips were carefully taken down to bare meal with a Dremel tool and a rotary wire brush. These parts were replated with nickel using a Caswell replating kit. This kit comes complete with everything you need to nickel plate small parts and is very easy to use. Sure beats taking small parts to a commercial plater. At the same time, the frame and battery holder which are hidden under the body were also stripped of rust and replated. The results were really good and add a professional and original touch to the restoration. Below see some pictures of the restoration process.
 |
Original model with windshield, seats, top cover removed. Some sanding completed. |
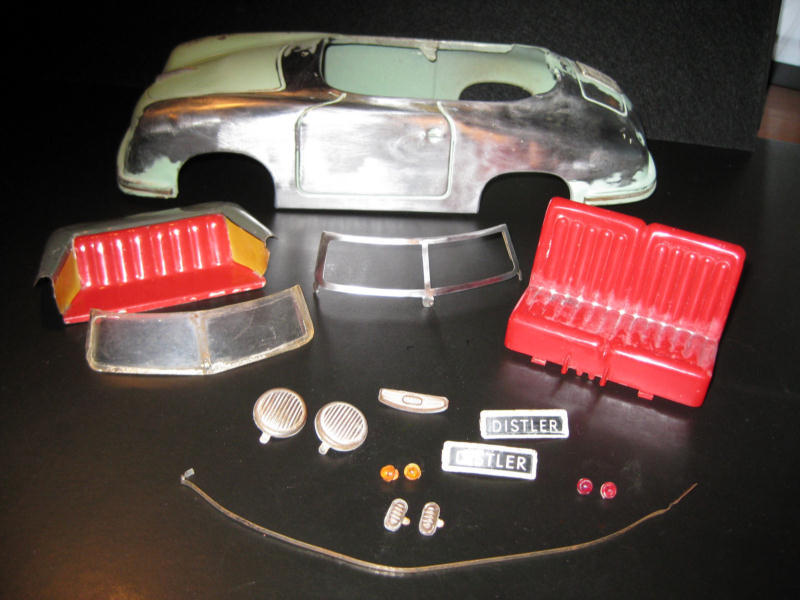 |
Small parts, seats & windshield removed from the body. |
 |
Bottom plate was in excellent condition, and used without further restoration. |
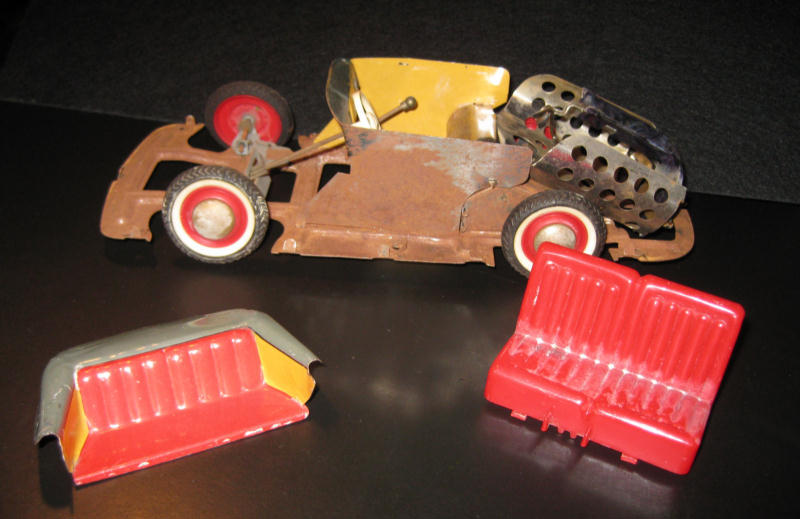 |
Rusty frame and door panels. Dipping & replating solved this problem! |
 |
Basic body stripped of exterior parts! |
 |
Basic body stripped of all paint inside and outside. |
 |
Underside of the basic body stripped of all paint. |
 |
Initial applications of body finishing putty to complete repair of the body dents. |
 |
Another view of the body putty application after initial sanding. |
 |
Primered body. Several primer coats used until all dents were gone. |
Painting the body followed final primer and sanding. In this case a
bright red paint was chosen to match as closely as possible the original
red used on Distler Porsche models. The original color of this example is
rarer but red is much more attractive and easy to find in a common rattle
can! Three coats of red paint were utilized with light sandings in between
producing a very nice finish! The underside of the body was also
painted.
 |
This is the basic body shell. It is one single stamped metal piece that is attached to the chassis. What you see is the result of a lot of work. First the body was completely sanded to bare metal. Then a small hammer was used to pound out several dents. The body was then primered and then painted with three coats of red paint. Light sanding was done after each coat. Sound familiar. The process is not dissimilar from what happens to the real car in restoration. |
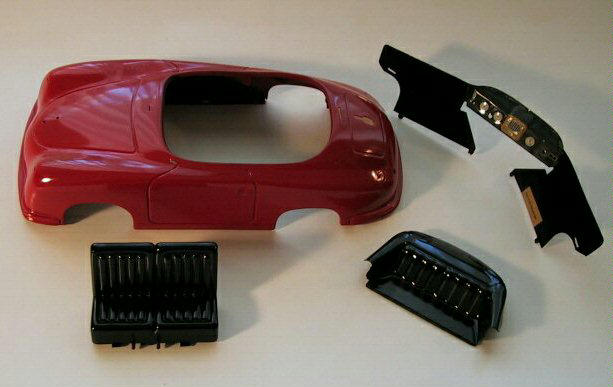
The seats, top cover and door panels (which are attached to the dash), were also repainted, in this case black, for a slightly different look from original. Since this model is a keeper, I took some liberties in the restoration!
| This picture show the finished body together with the tin dashboard and door pannel assembly (upper right), the piece which makes up the cover for the convertible top and rear seats (bottom right), and the plastic seat, all of which were refinished in black. Originally the seat was grey plastic. The dashboard was in nice enough condition and didn't required a redo although the door panel portions of this piece were also repainted black. The convertible top cover/rear seat assembly, top right in the picture, is normally painted grey representing the rear seat, and dark grey for the top cover, but has been refinished in black to match the seat. |
 |
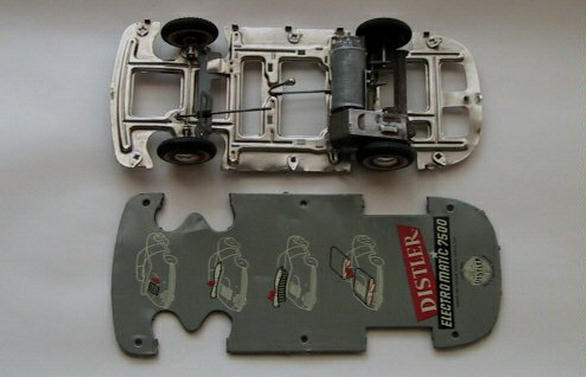
Below is the body together with the bottom plate which needed no
restoration and was used as is.
 |
This image shows the refinished body together with the bottom plate. You can clearly see the six holes through which access is obtained to reach the fasteners that hold the bottom plate to the body and chassis. The writing and battery directions are printed onto the bottom plate, which is often scratched. Having a bottom plate in nice condition is very helpful in maintaining originality. If it is too scratched up, it can be sanded and repainted black or dark grey. |
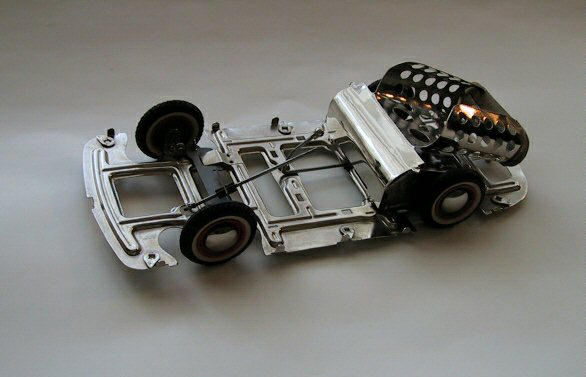
| Shown here are the completed body together with the chassis assembly, complete with wheels, steering assembly, gear shifting assembly, battery holder, and the electric motor/transmission unit underneath. The bottom plate is fitted underneath the chassis. In this case, the metal parts were all disassembled, cleaned and replated. This included the metal hubcaps, which were removed and replated. |
 |
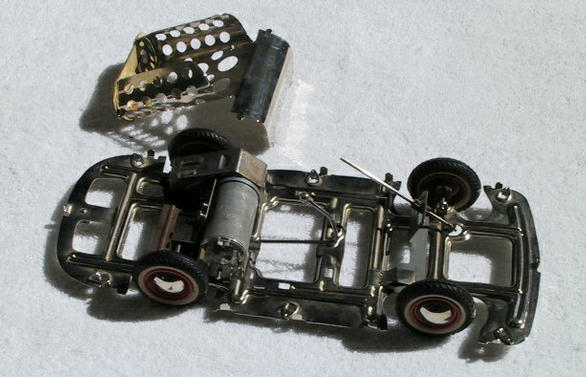
Below is the chassis with motor pack and battery
holder shown without the body or the bottom plate.
This combined assembly has been disassembled, de-rusted
and replated. The battery holder is sized for two D-cell batteries. At the
corners of the chassis and in the center at both sides you can clearly see
the turn fittings that hold the body in place, as well as the steering and
shifting mechanisms. The next step is installing the single piece that makes
up the door panels and dash.
 |
Chassis showing motor transmission assembly. |
 |
Chassis with wheels, steering, shifter, battery/motor assembly. |
 |
Chassis showing engine/transaxle and bottom plate. |
Before the body goes onto the chassis, all the
exterior pices that attached to the body must be fitted, headlights,
tail lights, licence plates, and the windshield and
frame. All of the bright metal parts have been de-rusted and replated.
Fortunately the "Distler" licence plates were in good shape and were used
without restoration. Once all of the parts shown below have been fitted,
the body is then attached to the chassis, and the bottom plate is attached
to the bottom of the chassis. The project is complete!
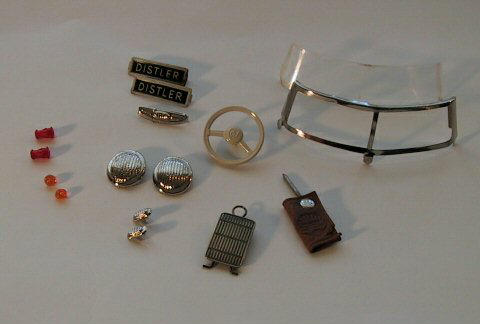 |
Windshield and frame, rear deck grill, key, steering |
Below is the finished product!
Careful restoration of the body, the sanding and repainting,
and the proper assembly of the replated parts result in a finished Distler
Porsche 7500, that looks like new, but for a few exceptions is not exactly
as original!
But who cares?
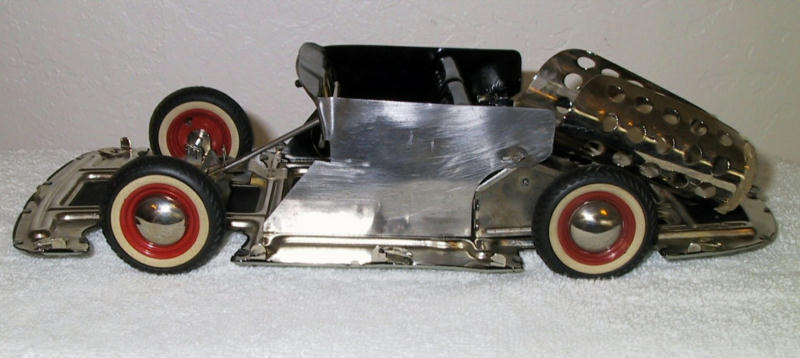 |
Chassis with wheels, dash/door panel piece, motor/transaxle assembly & battery holder. |
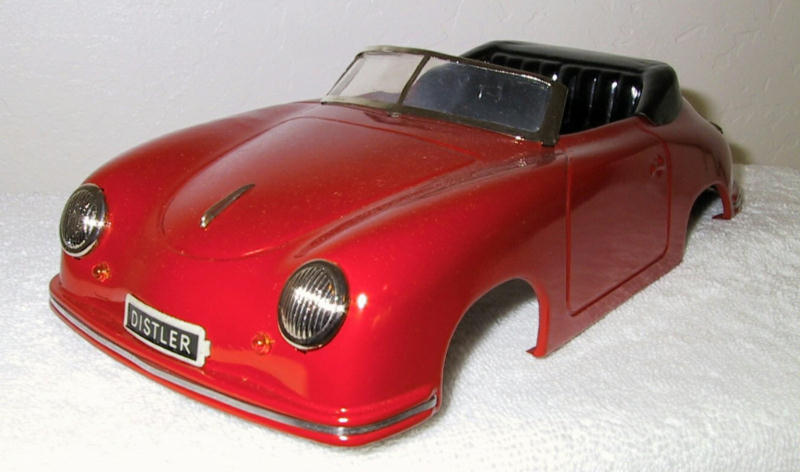 |
Completed body ready for final assembly! |
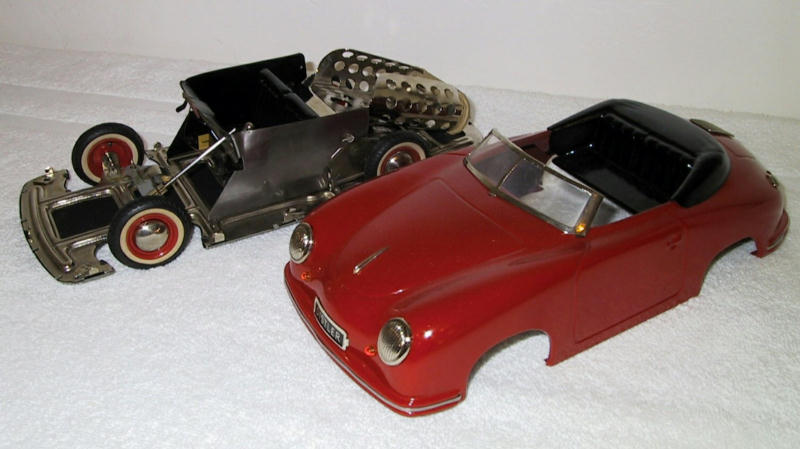 |
Body and Chassis just before final assembly! |
 |
Those familiar with Distler Porsche models will notice several deviations from original. Most evident are the seats which are painted black, but were originally gray. Also the top cover/rear seat which was partially gray representing the rear seat back, and the cover itself which was a dark gray. You can see both of these original parts in the second picture from the top of this website. Also the rear red plactic taillight is not original. It's a long story, but those little red plastic taillights are "on-buttons" that are on my wife's washing machine. I actually went down to the Maytag store and ordered these little red plastic on-buttons which would light up on the control panel of the washing machine when certain features were turned on. I have since found a source for exact reproductions of these red plastic tail lights.
 |
The steering wheel was also stripped and repainted.
 |
 |
Note the non-original red Maytag applicance "on-button" stoplights! |
Restoring this Distler Porsche 7500 was a fun project. It took about
six months to complete. It was one of those projects that I would work on
a little, put it down, and return several weeks later. Like
regular sized 356 Porsche restorations, it involved disassembly, strippling
the paint, pounding out the dents, primering the body, repainting, replating,
restoring the motor, detailing the chassis, de-rusting, and final
assembly. Of course, the cost was minimal compared to a "real" 356
Porsche restoration. Cost was about $300.00 total including buying the Distler
Porsche in the first place. Other costs included a small parts plating kit,
paint remover, sandpaper, a couple rattle-cans of paint, and the Maytag
"on-button" replacement red plastic tail lights!
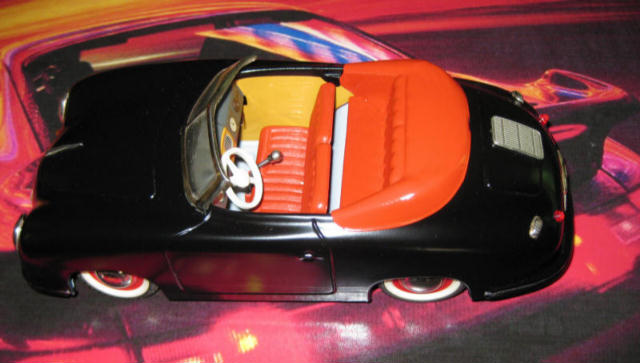
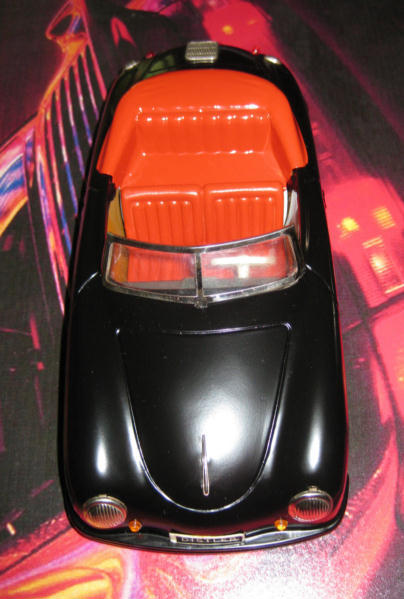
Below is the second Distler Porsche that I have restored. Of the original colors that Distler Porsches came with, the only one I don't have in my collection of original unrestored Distler Porsches is the dark Metalic Blue. Since I couldn't find a matching dark Metalic Blue in a rattle can, I elected to paint this one the color you see. One of these days, I'll find an original unrestored dark Metalic Blue Distler Porsche. Note in the picture below that the seats, door panels and tonneau are original on this restoration compared to painted black on my first effort. As with the first project, the body was taken down to bare metal, dents removed, primered and repainted. All the bright parts were again replated. Also noteworthy, the rear red plastic tail lights are original!
 |
 |
The red taillights are originals in this restoration! |
The Most Recent Distler Porsche Restoration!
 |
 |
The black Distler Porsche added
8/16/11!
![]() Click
here to see many more
Distler
Porsches!
Click
here to see many more
Distler
Porsches!
![]()
![]() Click
here
for 356 Porsche
Factory Technical
Manuals
FOR
SALE!
Click
here
for 356 Porsche
Factory Technical
Manuals
FOR
SALE!
![]()
![]() Click
here
to see
DerWhite's
NEW Sales Literature
Book!
Click
here
to see
DerWhite's
NEW Sales Literature
Book!
![]()
"DerWhite's
356
Porsche
Sales
& Technical
Literature......the
Book!"
Size 8.5 x 11 inches, Hardbound, 356 Pages, All Color!
![]() Click
here for more details about
DerWhite's
New Book!
Click
here for more details about
DerWhite's
New Book!
![]()
This website project was researched and created by:
Charlie
White
Scottsdale, Arizona,
USA
Email:
derwhite@aol.com
This website was designed for educational purposes to document the restoration of a Distler Porsche 7500 metal model.
and was updated on 1/5/2012, updated 1/18/14.
![]()
The images on this website are copyrighted, and may not be used
for any purpose without the written permission of the owner.
Copyright @ 20010 & 2014, DerWhite
Productions, Phoenix, Arizona
USA