1959 Porsche 356-A Coupe Restoration, 2006-2010
Including Costs!
By: Walter and Rebecca Nolte
![]()
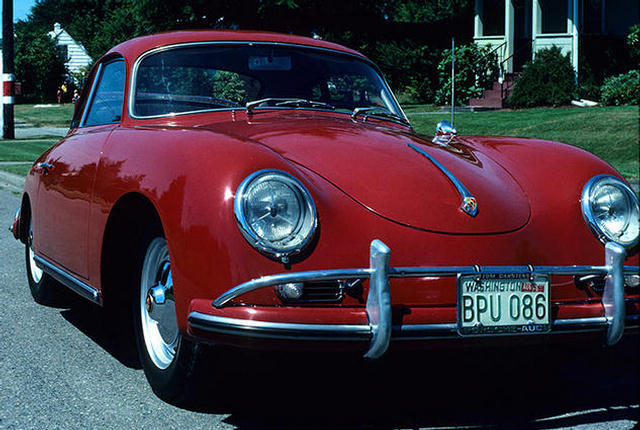
The Beginning......a 1959 356-A Normal Coupe!
 |
1959 356-A Normal Coupe. Purchased in 1972 for $1,800.00. |
Pictures of the finished project are at the end of this website!
Introduction:
Over the last several years, the 356 Registry Talk Forum has contained numerous postings from members and non-members asking about the costs of restoring a 356 Porsche. So here is a summary of our experience. All costs and receipts have been collected and categorized for the over four year restoration period starting in 2006.
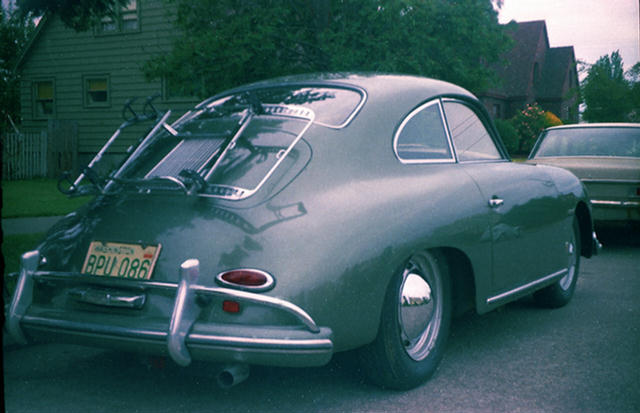
First, here is some background information. We started with a 1959-A Normal Coupe that my wife purchased for $1,800.00 in 1972. The COA indicates the car left the factory on October 25, 1958. This was our first car as a married couple. I was a graduate student at the time, and she reminds everybody who admires the restoration or asks how long we have owned the car that she was working at the time and I was not! We drove the 356 for a dozen years as one of our regular cars. During the late 70's, we rebuilt the engine's top end and had it painted Peru Red, a 1974 Porsche 911 color. The car had been repainted metallic grey/green just prior to our ownership. The pictures below show the car as grey/green in 1974, and Peru Red in 1977.
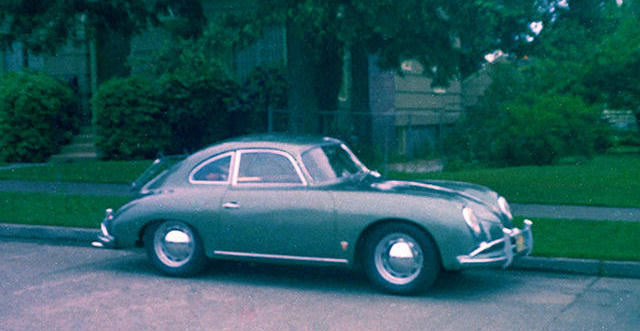 |
As originally purchased in 1972. |
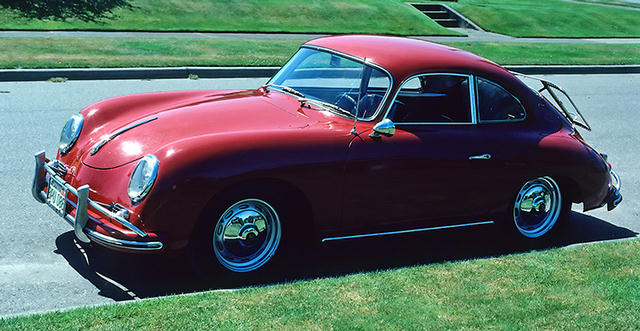 |
First restoration, repainted a later Porsche color, Peru Red, in 1977. |
We painted the car the 911 color at that time because we liked this
red and didn't know any better. After our two children were born, we gradually
drove the car less and less, and finally just stopped driving it completely
after a main bearing froze in 1998. The car was hauled around the country
as we moved for different job opportunities, but it was always stored inside.
Our son told me about a year ago that he and his childhood friend often used
the front hood as an impromptu slide when he was about 10. So, the engine
was frozen and the body deteriorated with nicks and scratches, mostly from
kids' bicycles. Although we currently live in the middle of Wyoming, until
1993 we lived in the Pacific Northwest, so the
356 had the usual rust
in the floor, battery box, rear front fender,
and door sills. We had always planned on restoring the car, but thought
this would be a retirement project. We decided, however, that if we waited
much longer, we would be too old and infirm to get into it, let alone drive
it. So we started the restoration in 2006.
![]()
Preparation:
The first two years were spent buying parts that I knew would be needed, partly to spread out the financial expenses. These were mostly body trim, interior pieces, suspension and brake parts. They were purchased from the usual vendors and on eBay. The vendors are listed below including how many orders and total dollar amounts spent with each. All but one of these vendors advertise in the 356 Registry magazine. Just a quick note, if you are preparing a restoration budget, don't forget about postage and shipping. Our shipping expenses for parts totaled almost $900.00!
Hours were spent pouring over catalogs, reading a well-worn copy of Henry Elfrink's Porsche Technical Manual that came with the car, browsing the 356 Registry and other internet sites including searching for parts on eBay, and reading about restorations in the 356 Technical and Restoration Guide and Dr. Johnson's The 356 Porsche: A Restorer's Guide to Authenticity.
A digression about eBay, about 20 items were purchased on Ebay. There are some bargains on eBay and some parts not readily available from other sources. Besides the headlight assemblies and cover glass described below, I bought a windshield wiper motor that worked but had the wrong shaft for my wiper linkage, used rear suspension stops that were in no better shape than the ones I had, and painted rear top garnish rails. For some reason, our rails are stainless steel and I thought these might work better. They did not. Earlier in my collection of parts, I bought a lot of items on eBay, but after a bit, it became obvious that if an item is listed once on eBay, it is likely to be listed again and watching part sales over a period of time will provide a good sense of value. So I learned to wait and watch prices.
In 2006 and 2007, most of the body trim and interior parts as possible were disassembled knowing that professionals would be used for the body, interior and most of the mechanical work. Parts were marked and bagged, but unfortunately no pictures were taken for later reference. This was a mistake! A photo record would have saved some time and prevented false starts, so taking lots of photos before, during and after disassembly is highly recommended, especially if you are going to refurbish parts such as horns or to document the sequence of knobs, bolts, and washers on such things as the fresh air vents.
Except for the quarter windows, the glass was left in the car because I wanted a professional to remove and reinstall the front and back windows and did not want the door windows rattling about during transportation. All the glass except the windshield appear to be original to the car. The windshield was replaced in the 1970's, so it has the SIGLA markings. During this time, I also refurbished and repainted many of the removed parts, some to be discarded later and replaced by reproduction items. Included in this work are items like bumper brackets, bumper guard supports, engine tin, seat rails, steering box cover, gas tank, interior mirror, and headlight assemblies. The door window frames were removed and polished, the channels were replaced, and the sections of the frame unseen in the doors were clear coated to protect them from corrosion. I stripped and painted the sun visors with an SEM vinyl paint. They look great, but if I had to do again, I would wait to more closely match the paint color of the visors with the new headliner.
I disassembled the door handles and assembled the inner parts with new O-rings installed in reproduction handles. Lube these well during assembly as I had to take one of them apart again after it would not work on the car during trim reassembly. I also purchased on eBay one seat recliner and used this to replace one with quite a bit of pitting. Disassembly of the recliners is easy. Rewinding the spring is difficult! There is plenty of literature on this in the 356 Registry data base, including some diagrams on how to make a tool for rewinding the spring. Still ended up with lots of sweat and more blood trying to put the spring back in the right place. Finally figured out a simple way of doing this with an old hex wrench and vice grip. The coiled spring has lots of tension, so wear safety glasses.
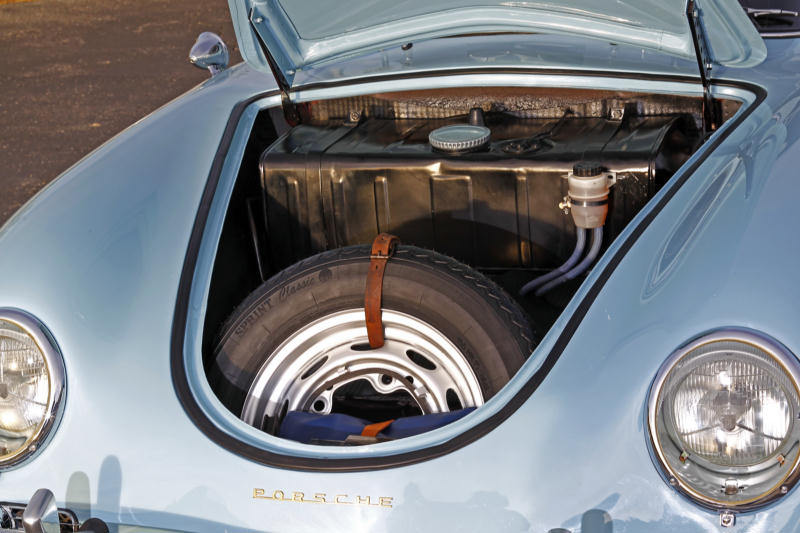
The gas tank was flushed and boiled at a local radiator shop. Although there was not much fuel in the tank, what was there had jelled into a sticky smelly mess. The radiator shop owner, thinking he was doing me a favor, painted the tank. Not a particularly good job. Probably did not realize that the tank is in clear view when the trunk is open. So, had to sand and repaint. Used a rattle can of Rustoleum in satin black with clear coat. After replacing the engine in 2009 and before restoring the body and interior, I dripped a few drops of gas on the top of the tank during a refueling. Immediately the paint bubbled, so I covered the tank a third time with a black and clear engine paint. This seems to resist fuel spills, although I am now very careful with the fuel hose.
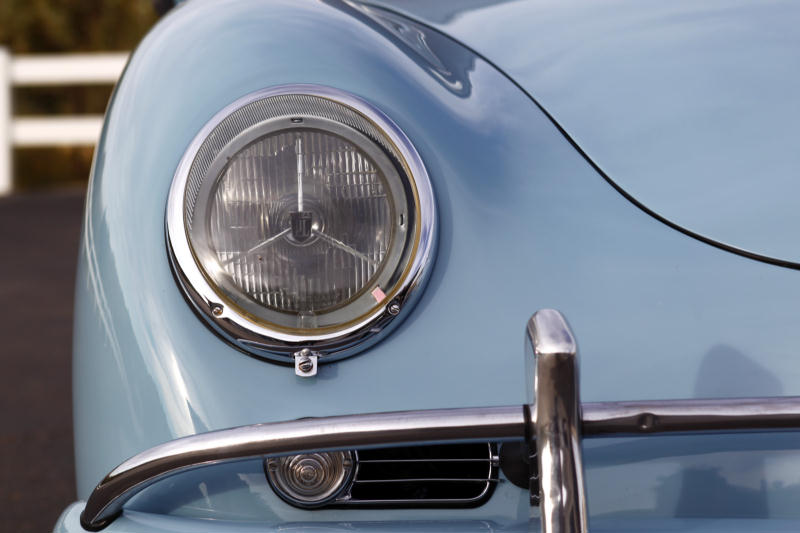
I bought several headlight assemblies on eBay, looking for original Hella glass in good shape. Both of the originals were cracked. I ended up with lots of junk and about six glass covers, of which only two were acceptable. I refurbished one headlight assembly using Stoddard wheel paint. It looks great, but I decided not to risk these original pieces and boxed them up after buying reproductions for fifty dollars. When we first purchased the car, the headlight lamps were Lucas PL700 fitted with 45/40 six volt bulbs. We could hardly see with these, so they were replaced with sealed beams in the 1970's, but the Lucas lamps were saved. I believe these are original vintage Lucas parts that were common on sport cars during the 50s and 60s. I found some 12 volt H4 60/55 lamps with the right base at a motorcycle shop and put these in the Lucas holders and installed them in the reproduction headlight assemblies. This gives the car a nice period look. If I ever show the car in a concourse judging I can always install the original Hella assemblies.
 |
Repainted in the late 1970's sporting Lucas headlights. |
The car was rust proofed as much as possible using several bottles
of SEM 39308 Rust-Seal. This product is easy to apply, sand, and paint. The
rust seal was used on virtually everything I could reach, like the inside
of the doors and almost everything else that I refurbished. The undercarriage,
suspension, engine and transaxle were power washed several times and the
bumper guards, interior mirror, engine air intake grills and deco strips
were polished and refurbished using Q-Tips to get into the corners. More
on the deco strips later in this writing. The bumper guards look great after
sanding with ever-increasing finer grit sandpaper and polishing with a buffer.
To prevent oxidation, use aluminum seal on these and other anodized parts
before reassembly. There are several products on the market for this, especially
ones used by the trucking industry for aluminum wheels, but these can damage
paint. I eventually found and applied a high-end and expensive wax recommended
by a local bike shop for motorcycle brightwork after the trim was back on
the car. Works well, but it would have been better to seal with a stronger
product before assembly on the car.
![]()
Mechanical:
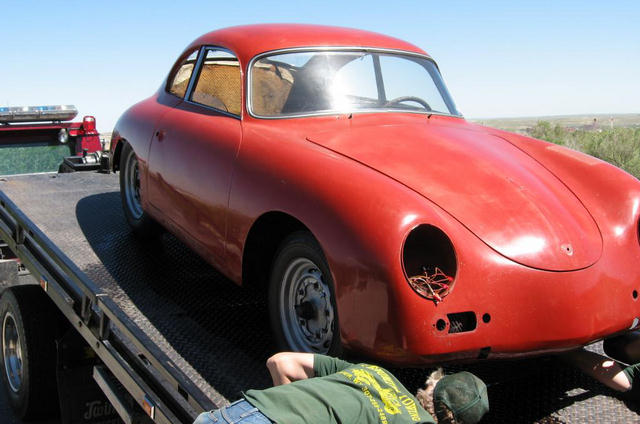 |
Headed to the shop to start the restoration in 2006. |
The picture above is the car being loaded on a tow truck on the way
to the mechanic's shop. When we purchased the car in 1972 it did not have
the original engine and as we had decided we wanted to drive the car after
restoration, we were not concerned about restoration to a concours or original
level. We did want it to appear period correct, however, and wanted the extra
power. So I purchased a 1968 912 engine from
a 356 Registry member to replace the 1961 engine with the frozen main bearing.
The new engine had a polished crank, rebuilt top end, new main bearings and
push rod tubes and a complete new gasket set. We had the new engine installed
in 2008. Also installed were many of the suspension and brake parts I had
purchased over the proceeding two years. Since we were not in a rush and
needed to save some money, our mechanic took his time and about nine months
to do the body and paint work. A real back burner project for him. The mechanical
work done in Wyoming, but our mechanic had worked in Porsche
dealership/restoration shops in California and Las Vegas. Great skills for
rural Wyoming. Since the 912 engine came complete with Weber carburetors,
generator and distributor and a 200mm flywheel, I decided
to convert the entire car to 12 volt. This takes a lot of patience
and trial and error during reassembly. We have the 1961 normal engine as
a backup and I had already cannibalized it for some heater box and throttle
linkage parts. We debated whether to install the engine first or tackle the
bodywork. But after our mechanic told us he would be more comfortable working
on an unrestored car rather than risk damage to a new paint job, we decided
to go ahead with the engine first.
We installed a "sport muffler" at this time, replacing a stock muffler. I believe the car had been tapped in the rear before we purchased it. There was some evidence of this in the rear sheet metal, but more telling was the fact that the car did not have through the bumper guard exhaust and did have a single override bar on the rear which I believe is correct for pre 1958 models. The sport exhaust fit under the body work with a slight modification to the tail pipes for clearance.
The 12 volt conversion, 912 engine, and 200mm flywheel did provide
a few challenges, especially with the throw out bearing. The clutch, pressure
plate, and release bearing have to be carefully matched. We ended up machining
and balancing the flywheel before it all meshed. Several of the car's old
six volt relays also failed. These were fifty year old parts and maybe the
shock of 12 volts burned out the horn and light relays. Twelve volt replacements
are not expensive or difficult to replace, however. I bought
from Charlie White a black and white 356A and colored 356B wiring
diagrams. The "B" color wiring diagram is close enough to an "A" model
to be extremely helpful diagnosing wiring and electrical
issues.
![]()
Bodywork and Paint:
To my knowledge, there are only two other 356's in our city (pop. 50,000), both owned by the same person and one of these is a 1959 Coupe like ours, also under restoration at the time of this writing. However, there is a large automotive enthusiasts group in town, mostly muscle cars and hot rods and several high end restoration shops. We live in a boom and bust oil and gas town and during the boom years, lots of money is spent on gasoline toys. These enthusiasts were extremely valuable in providing advice and ideas on local vendors, like the radiator shop or an electrical shop that rewired the windshield wiper motor. They pointed me to four or five restoration shops for estimates. Some of these were too busy or told me they could make so much more on the typical slash and replace insurance work. Restoration work was not worth doing anymore.
We received estimates from $6000 to $30,000 for body and paint work! I knew that $6,000 was way too little and that eventually this shop would probably nickel and dime us with "change orders" before the project was finished. The $30,000 estimate was from somebody that never looked at the car and probably did not want to do the work. We chose a younger restorer just starting out after he carefully looked the car over for about two hours and I had a chance to look at his shop and work. The shop was kind of a co-op that included an upholsterer and a part-time mechanic and was operated in association with a large private collector in our city who was one of my professional contacts. Starting in mid 2009 and finishing in April, 2010, the metalwork, paint and interior restoration were provided by this co-op. Although they had limited 356 experience, their work was excellent, especially interior work.
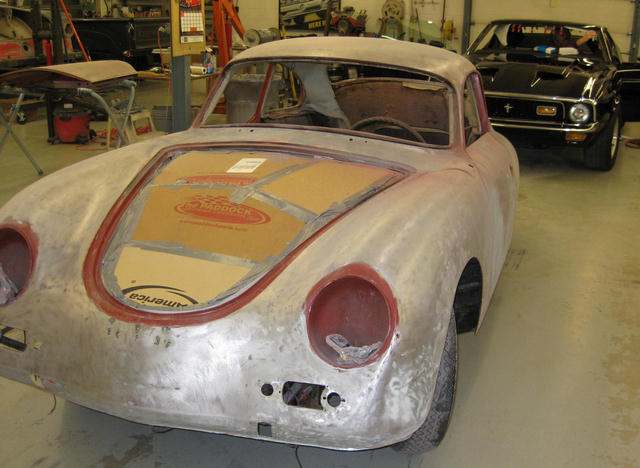
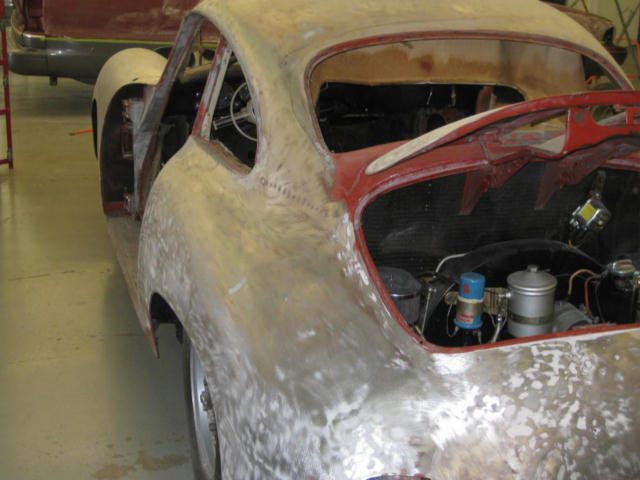
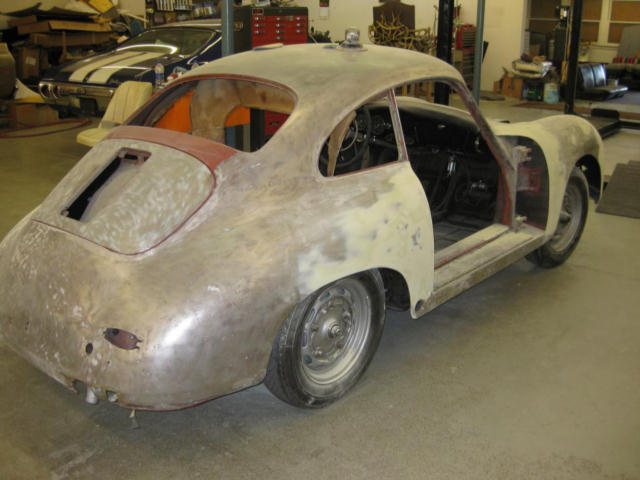
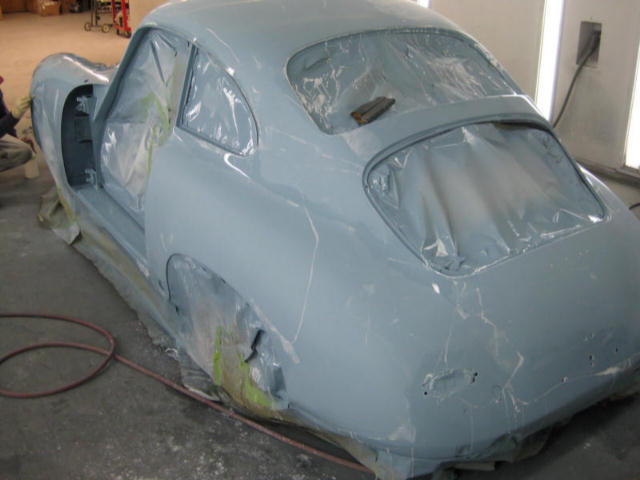
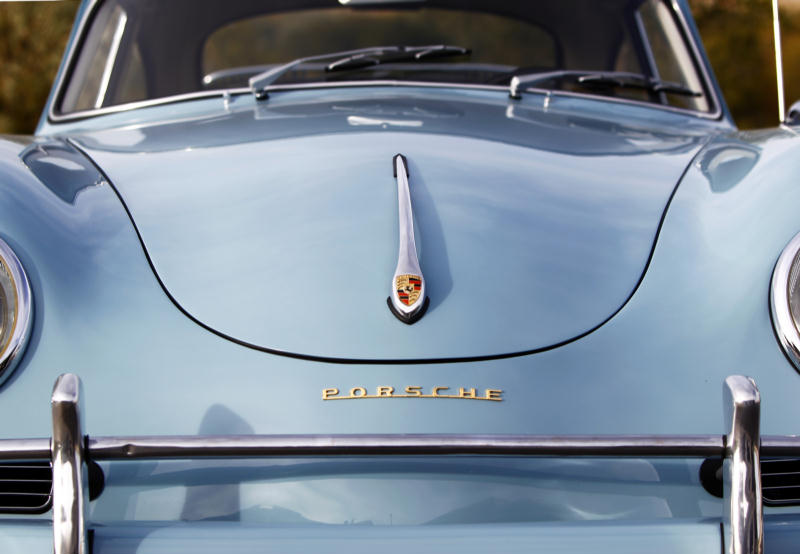
The car was originally Orange 711 with black vinyl interior and tan or oatmeal carpets. A prior owner had dyed the rugs black. We agonized over the color, especially because my wife is an artist and designer and has strong feelings on color. We ordered six color chips from John Willhoit at a cost of $210. Money well spent when you are going to spend thousands on a paint job. We decided on Meissen Blue, with black interior and grey carpets. Carpets, headliner, and new front seat covers were ordered from the usual vendors. Although this color combination was not original to our car, the material is correct for 1959 and I suppose the combination could have been special ordered. Following are pictures taken early in the paint and filler removal and metal work process.
 |
 |
 |
 |
 |
As expected, there were some
surprises! The car was not prepared properly when painted
in 1977. Especially on the roof and left front fender, three layers of paint
were masked by cracking filler. Some panels of the 356 had only the Peru
Red. All of this old and inferior bodywork had to come
off! The trailing edge of the right front fender needed replacement.
This piece had been replaced on the left side in the 1970s.
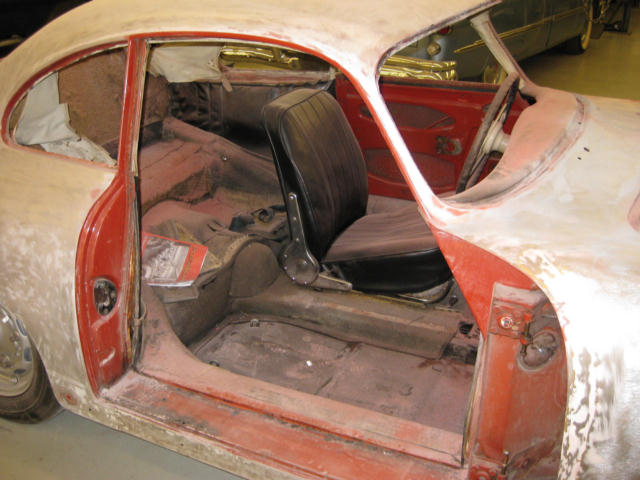
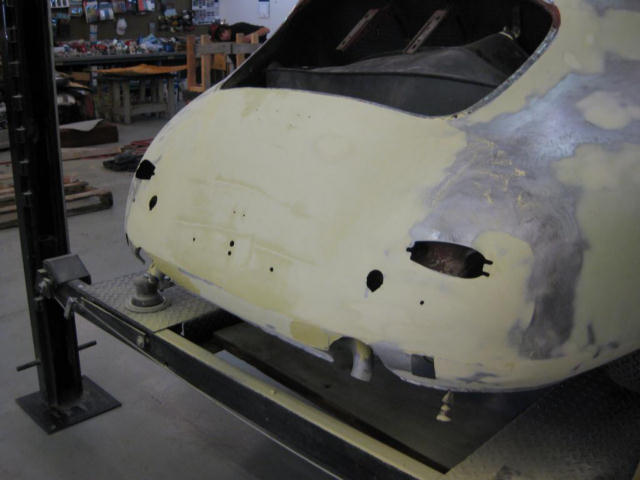
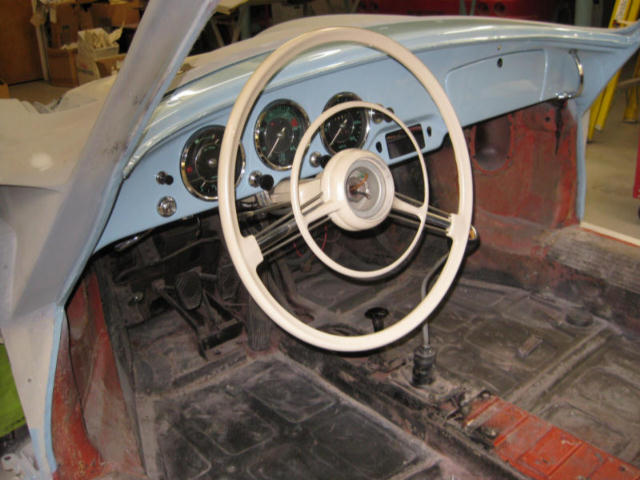
The dash was completely rusted! We ordered a
fiberglass reproduction and used the old dash as a template to mold and shape
the fiberglass one as these reproductions are "just close" when manufactured.
This is an example of "never throw anything away until done." There was also
a little rust in the front lower left windshield frame, probably why the
dash was rusted. Expected were repairs to the door sills and replacement
of the battery box. Although we knew there was a rust spot on the front left
floor, after removing all the undercoating and insulation, the cancer had
spread enough to necessitate replacement of the entire front half of the
floor rather than just a patch.
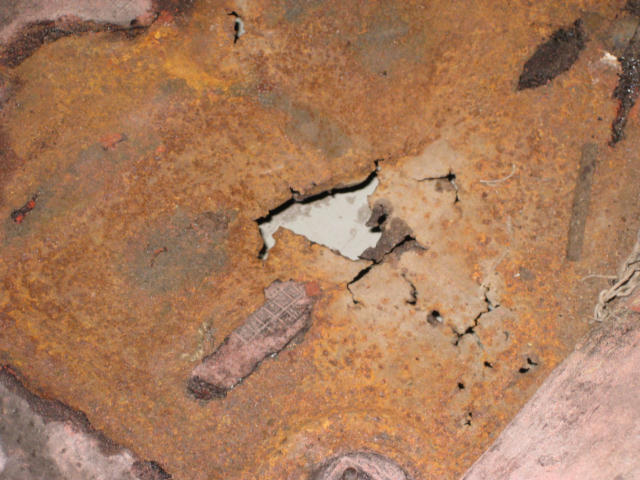 |
A "little problem" in the floor! |
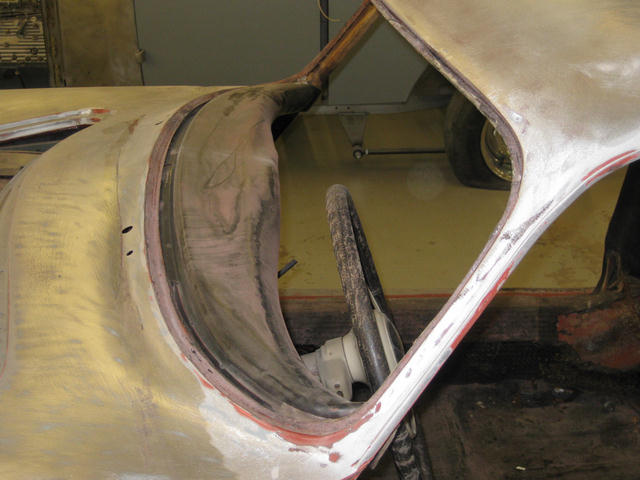 |
Significant rust in the passenger side front window frame! |
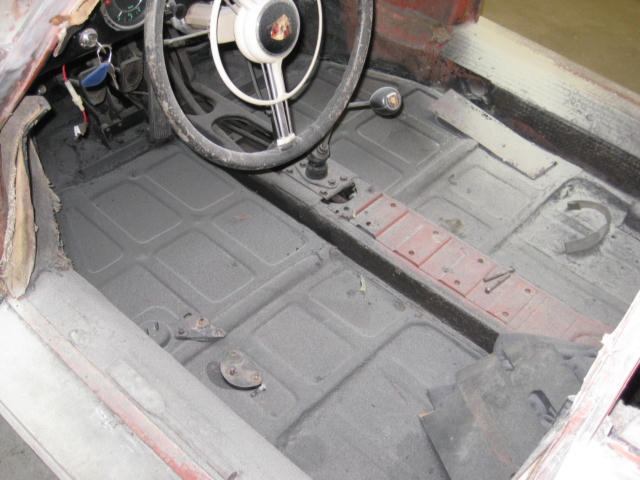 |
Floors on both sides were replaced. |
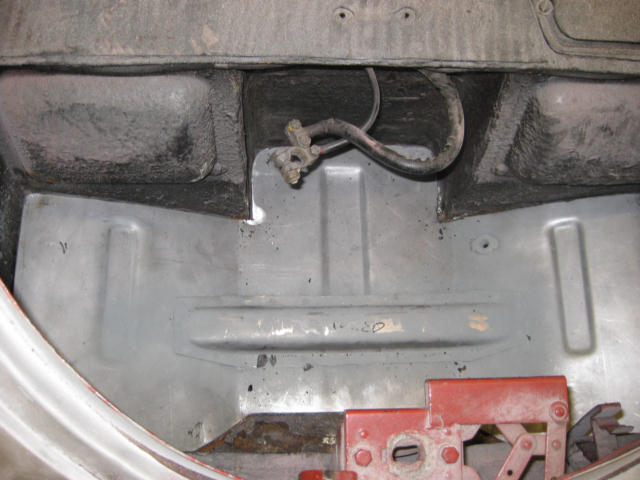 |
New Battery Box sitting in place. |
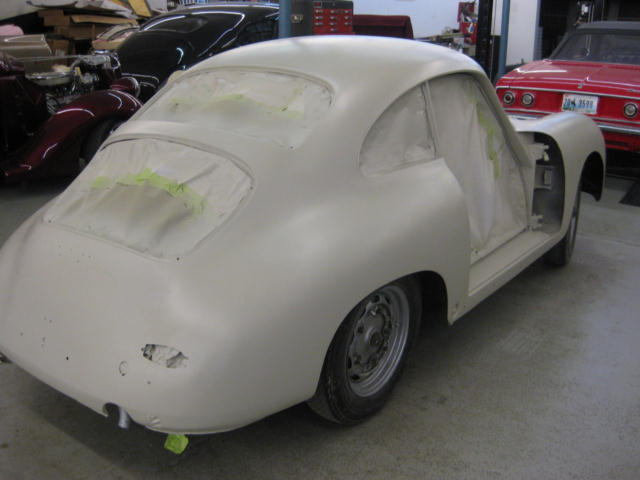 |
Body work completed, primer and sanding! |
I visited the restoration shop at least once a week and took a week
off work in the spring of 2010 to help in the reassembly. It is great to
have a shop that will let you do this and one of the benefits of having the
work done locally. I have an acquaintance in town with a 914. His car was
being restored in another state. It was butchered, especially the interior.
He is now having the interior redone at the same shop that did all of our
work. During the reassembly process, I left with the restorer a parts manual,
Stoddard catalog, and copy of Dr. Johnson's The 356 Porsche: A Restorer's
Guide to Authenticity. As the restorers did not disassemble the trim, these
resources were invaluable to him, and me as I had forgotten many of the nuances
after four years. During the week off, I also chased parts, bringing dozens
of boxes of parts purchased in 2006 and 2007. These were all marked with
the name of the part(s) and part numbers.
So what can you do as a non-professional, or somebody who knows just enough to be dangerous, to assist in the reassembly? The list that follows represents 30+ hours of reassembly work:
| Front & Rear Bumpers | Headlights | Tail Lights | Rear Reflectors |
| Glove Box | Horns | Horn Grills | Turn Signals |
| Rear View Mirrors | Visors | Battery Cut-Off Switch | Battery Hold Down Springs |
| Window Frames | Front Hood Seal | Engine Lid Grills | Radio Antenna |
| Turn Signal Flasher | Steering Wheel Cover | Engine Lid Buffers | Glove Box Buffers |
| Shift Linkage Boot | Ash Tray | Radio Blackout Cover | Emblems |
| Door Stops | Windshield Wipers | Windshield Washers | Door Handles |
Many of these parts were reproductions and I will discuss the challenges
with reproduction trim and rubber products below. I also used this as an
opportunity to clean as many electrical connections and terminals as I could
reach. It was great to have the car on a lift. Installing body trim parts
and reconnecting electrical wiring on horns and lights was considerably eased
by the ability to raise or lower the car. We used heat shrink tubes whenever
appropriate. I replaced the transaxle fluid with SWEPCO 201 Gear-Lube. This
product is highly-rated, but expensive. As it has been so long since we have
really driven the car, not sure if this fluid has improved the
shifting.
 |
 |
 |
![]()
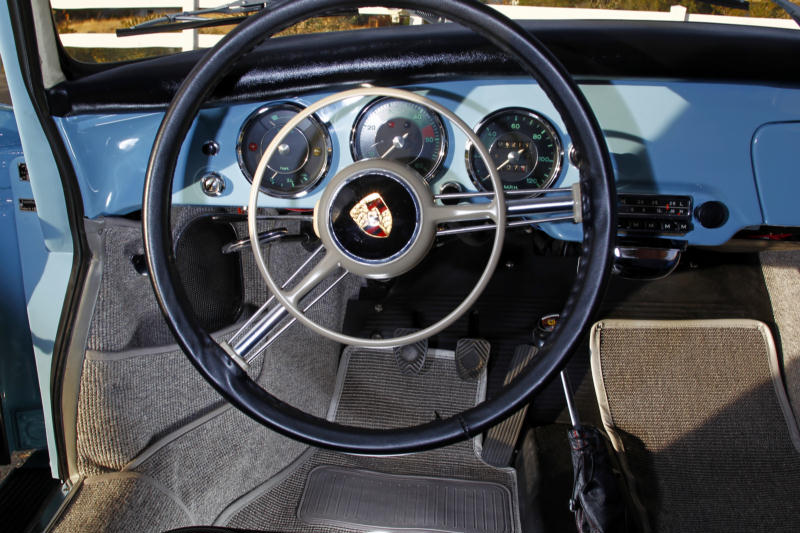
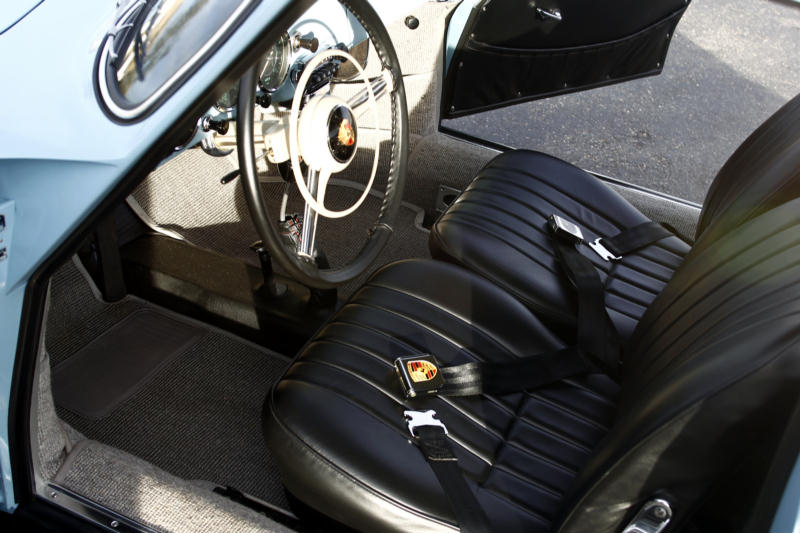
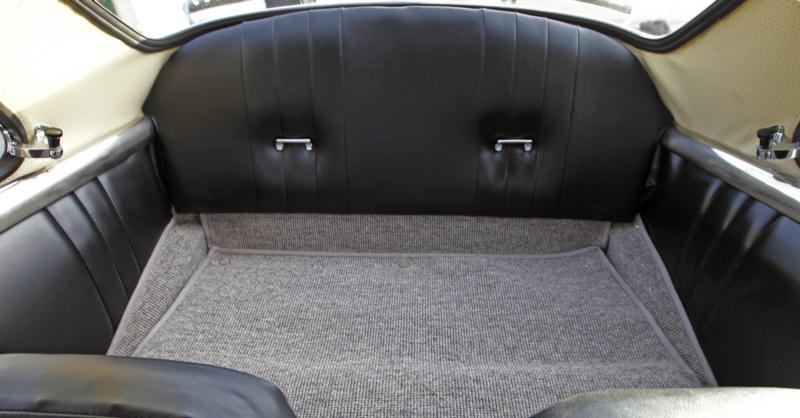
Interior:
Except for the door panels and rear seat, the entire interior has been replaced. This includes rebuilding and recovering the front seats, dash cover, headliner, rubber floor mats, sisal mats, tunnel cover, all the carpet, glove box liner, and correct Meissen Blue paint on the dash. For some reason, the car has stainless steel garnish rails. I like the look and as these were not in bad shape, so put them back on. Also removed and replaced most of the sound proofing or insulation with hush mat on the floors, doors and cealing. With the louder sound from the sport muffler, I am glad we did this. We expected to reuse the vinyl under the quarter windows and the rear deck, however, when we removed these to replace the insulation, they disintegrated. As my upholster is in high demand and could only work on the car for a few days, we did not have time to order replacement pieces from one of the 356 part vendors. There must be dozens of grains for black vinyl. We chose one that best matched the front seats and dash cover, but I would recommend a careful examination of all these pieces before taking to the upholster, unless planning to replace everything. Only a careful look at the new vinyl would reveal any differences. This would probably be noticed in a concours judging. The combination of blue exterior, black upholstery, grey carpets and sisal mats looks great and gets lots of comments. The instruments and switches were reinstalled as the interior work was being done.
![]()
Expenses:
This was not intended to be an all out concours
restoration! So what did this restoration cost? What follows
is a breakdown by category of the restoration costs with some notes. There
is some slippage or overlap in these categories, but the total is accurate.
The line items in red are major categories of expenses with a total for that
type of expense. The line items below in black are items included in the
main category. Not all of these items are detailed, hence they may not add
up to the total in red.
Expenses |
Cost |
|
| Tires, Wheels, Lug Nuts and Mounting | $1,001.37 |
|
Five Vredestein Classics 165HR |
$525.00 |
|
Four 4.5 inch Mangels Chrome Wheels |
$320.00 |
|
| Electrical Parts (non engine) (Note 1) | $650.63 |
|
Battery |
$200.00 |
|
After-Market Hella Horns |
$80.00 |
|
Switches, Oil Temp Gauge Repair |
$120.00 |
|
3rd Brake Light |
$80.00 |
|
12v Conversion Parts, Ground Straps |
$170.00 |
|
| Wiper Motor Repair | $40.00 |
|
| Body Rubber and Trim Parts (Note 2) | $1,974.29 |
|
| Threshold Parts, Pedals, Front, Turn signals | $200.00 |
|
| Horn Grills | $48.00 |
|
| Headlights | $48.00 |
|
| Deco Strips | $230.00 |
|
| Wiper Blades | $39.00 |
|
| Washer Jets | $28.00 |
|
| Reflectors | $48.00 |
|
| Windshield Trim | $72.00 |
|
| Reutter Badge, Emblems and Crests | $90.00 |
|
| Internal Parts (non upholstery) | $473.93 |
|
| Sisal Floor Mats | $116.00 |
|
| Door Wedge Set, Heater Slides | $40.00 |
|
| Striker Plates | $33.00 |
|
| Ash Tray | $30.00 |
|
| Radio Block-Out Plate | $22.00 |
|
| Window Soft Channel | $44.00 |
|
| Seat Belts | $50.00 |
|
| Floor Boards | $80.00 |
|
| Steering Wheel Cover | $36.00 |
|
| Upholstery Including Front Seats (Note 3) | $2,885.74 |
|
| Headliner | $75.00 |
|
| Leather Front Seats | $880.00 |
|
| Hush Mat | $234.00 |
|
| Carpet Set | $51.00 |
|
| Dash Cover | $60.00 |
|
| Glove Box Liner | $60.00 |
|
| Rubber Floor Mats | $310.00 |
|
| Screw and Bolt Sets | $165.42 |
|
| Brakes and Suspension | $1,342.09 |
|
| Bilstein Shocks | $350.00 |
|
| Dual Circuit Brake Master Cylinder | $200.00 |
|
| Wheel Cylinders | $390.00 |
|
| Link and King Pin Rebuild Kits and Bushings | $225.00 |
|
| Steering Coupler | $20.00 |
|
| Grease Fitting Set, Oil Dip Stick Temp Gauge | $50.00 |
|
| Engine and all Non-Interior and Bodywork Labor (Note 4) | $14,536.70 |
|
| 1968 Porsche 912 Engine | $7,200.00 |
|
| Decals, Electric Fuel Pump | $135.00 |
|
| Clutch and Pressure Plate | $347.00 |
|
| Release Bearing | $34.00 |
|
| 12 Volt Starter | $155.00 |
|
| Voltage Regulator | $92.00 |
|
| Brake Hoses | $120.00 |
|
| Plug Wires | $37.00 |
|
| Muffler | $522.00 |
|
| Carburetor Rebuild Kits | $74.00 |
|
| Oil Lines tune up parts | $73.00 |
|
| Fuel Tank Flush | $50.00 |
|
| Postage and Shipping | $892.32 |
|
| Expendable Supplies (Note 5) | $506.73 |
|
| Body and Paint (Note 6) | $12,613.97 |
|
| Miscellaneous and Junk (Note 7) | $827.50 |
|
| Car Cover | $200.00 |
|
| Tool Kit Pouch, Manuals, Literature
and Memberships, Battery Cut-Off Switch, Towing and Miscellaneous Parts |
$167.00 |
Some expense amounts above are rounded! Lines in RED are
important categories followed by
major included
expenses!
Note 1: 12 volt Odyssey battery. Similar in design to Optima, but rectangle and fits under the battery cover without modifications.
Note2: Includes $691 for rubber parts including a kit from International Mercantile. Except for a grommet or boot here and there, virtually all rubber parts have been replaced.
Note 3: Includes $749 for installation labor. Only rear seat and door panels are original.
Note 4: Includes $6,364.28 for labor to install engine, tune, rebuild brakes, front end, and carburetors, install shocks and install all parts listed above and towing.
Note 5: Includes 23 cans of spray paint in primer, various shades of black and aluminum, and clear coat. Spray Paint, Adhesive, Rust Seal, Degreaser, Wax, Chrome and Metal Polish, Cleaners, Engine Oil and Filters, Transmission Fluid, Fasteners, Sand Paper and Steel Wool.
Note 6: Strip to bare metal. Metalwork and installation of new front pan, battery box, and right rear front fender. Repair door sills and modify and fit dash ($60). Remove doors, trunk, and hood. Strip and paint door jams and underside of hoods. Undercoat wheel wells and undercarriage. Prime and paint body and panels, including bumpers and steering wheel. Align panels. Reassemble panels and trim. Includes $225.75 for removal and reassembly of all glass except quarter windows and $210 for six paint chips.
Note 7: Some parts that I bought, I did not use, including a useless set of "super" hubcaps from Performance Products, Automation, Ecklers. See discussion on eBay.
Total $37,870.24
This total was about 25% more than our estimates when we started the
restoration in 2006, partly because of shipping costs, but
mostly because of inflation and unexpected mechanical and
metalwork. In addition, I purchased a new set of Craftsman tools and
other specialized tools for a total of $268. There have been some "post
restoration adjustments" including work on the throttle linkage and a new
gas cap. In addition, I thought it might be interesting to breakdown orders
by vendors, all but one are Registry magazine advertisers. The number in
parenthesize is the number of individual shipments during the four year
odyssey.
![]()
Vendors:
Below is a list of vendors from whom I ordered parts during the course of this restoration, together with the number of orders for each vendor and the total costs of these orders. You will note that we used a wide variety of vendors, most all of which are regular 356 Registry advertisers and familiar to most 356 enthusiasts.
Vendor's |
# Parts | Costs |
| Performance Parts | 7 |
$1,224.00 |
| North Hollywood Speedometer | 1 |
$120.00 |
| NLA | 4 |
$148.89 |
| Zim's Autotechnik | 2 |
$286.80 |
| Autos International | 2 |
$135.50 |
| Sierra Madre | 3 |
$186.65 |
| International Mercantile | 3 |
$735.00 |
| JC Whitney | 1 |
$26.99 |
| Stoddard's Imported Cars | 36 |
$4,345.49 |
Total |
59 |
$7,209.32 |
![]()
Reproduction Parts:
As indicated above, we bought a variety of reproduction parts from several vendors. Generally, these parts required careful assembly, with a large dose of patience for proper fit. The headlight assemblies were the easiest to mount, although any knowledgeable Porchephile will notice immediately that they are reproductions. The Lucas lamps give them a great nostalgic appearance. Side deco trims fit well after carefully massaging the rubber bases and inserts. Front and rear bumper decos are another story. Only after heating and bending will they form to the bumpers. The rubber bases have to be carefully trimmed for length.
I used the original chrome bezels matched to reproduction tail light housings and lenses. The reproduction bezels just did not seem to fit properly in the rubber bases that were part of the kit I purchased from International Mercantile. I discarded the taillight bases that came with the reproductions as they seemed of less quality than the International Mercantile pieces. 1959 may have been the only year for the A model to have the "wedge" type front beehive turn signals. The originals wedges were pitted and one was split at the attachment screw. I searched for reproduction wedges at all our usual vendors and on eBay. I believe a run of reproduction wedges were briefly manufactured about three years ago. I was lucky enough to buy a pair. However, fitting these to reproduction turn signals and horn grills was a challenge, again requiring small shavings of the rubber and interior seals and lots of patience.
The original license plate/backup light was in poor shape. I bought a used reproduction on eBay for a nominal amount. Again, lots of patience required to make this work with the IM rubber base. Right after the car was out of the shop, I noticed a high quality reproduction with the part number and "Hella" stamps for sale on eBay and purchased it, again for a nominal amount. Not perfect, but one of my eBay bargains. This unit fit perfectly in the IM rubber. Always better to buy high quality items whenever possible as they seem to ease the reassembly process.
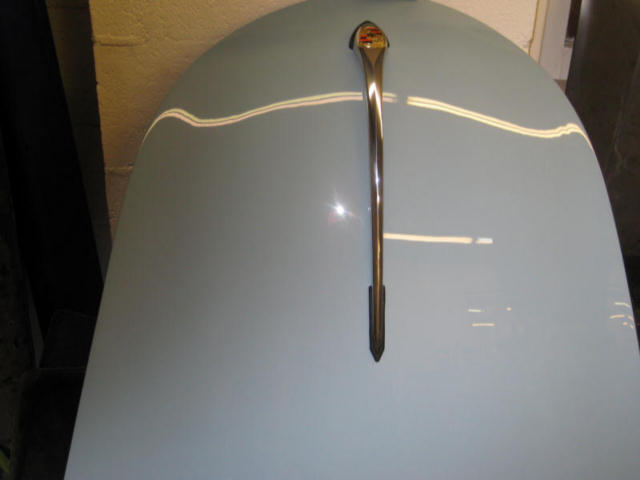
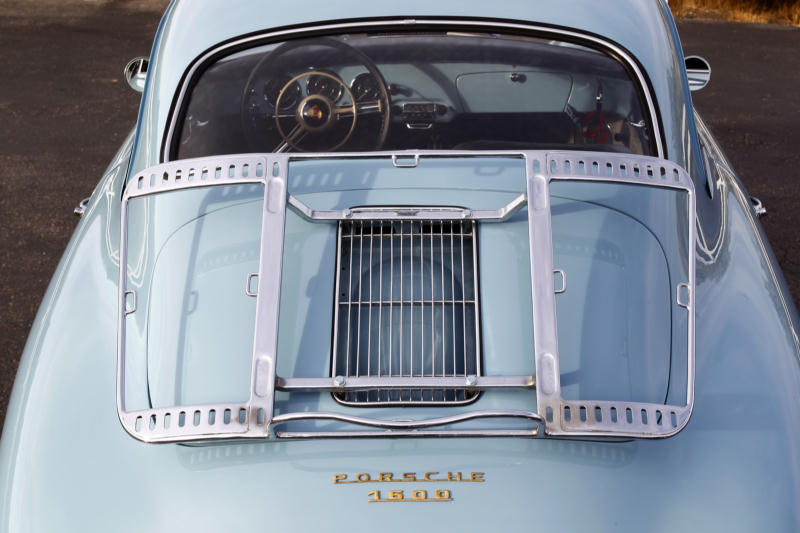
The rear "PORSCHE" and "1600" emblems are original to the car, although all the mounting holes had been filled. The emblems were in the glove box when we bought the car in 1972 and I have had them in storage for 30+ years. I polished these on a buffer and the restoration shop polished them again prior to assembly. We purchased a reproduction "PORSCHE" emblem for the front. As the body was being prepared for paint, we spent a lot of time making sure we were opening the right mounting holes for the emblems.
Unfortunately, I did not spend as much time as I should have on the outside mirrors. When we purchased the car, it was fitted with only a driver side mirror, an original Talbot Berlin. Sometime in the 70s, the glass fell out of this mirror and I replaced it with an off-brand "bullet" style mirror. I purchased two reproduction bullet style mirrors with the thought that mounting a passenger side mirror would provide an additional level of safety. We determined the location of these just prior to painting. I sat in the car and the restorer marked the left and right locations for the mirrors. However, the seat had not been rebuilt and was not anchored on the seat rails. After drilling new holes and mounting, the right side mirror, it is virtually useless and now is there only for decoration. The driver side mirror was not much better and the inexpensive reproductions did not have much adjustment travel. I finally replaced the new reproduction with the mirror I had on the car in the '70s. Does not perfectly match the passenger side, but nobody has noticed this inconsistency so far. My advice on mirror placement is to wait until the interior is complete, maybe even drive for a few miles to get the best possible seat adjustment before drilling holes. Maybe someday I will replace both mirrors with some vintage Talbots.
Also note that many of the screw and bolt sets available will not work.
I have several seat recliner screw sets, having ordered these in an effort
to get the right set. Must be something unique about the 1959 model, as we
ended up refurbishing the old ones. The screw sets for the hood seal and
door panels would not work as well. There was no bite, probably from years
of taking these in and out resulting in enlarged holes.
![]()
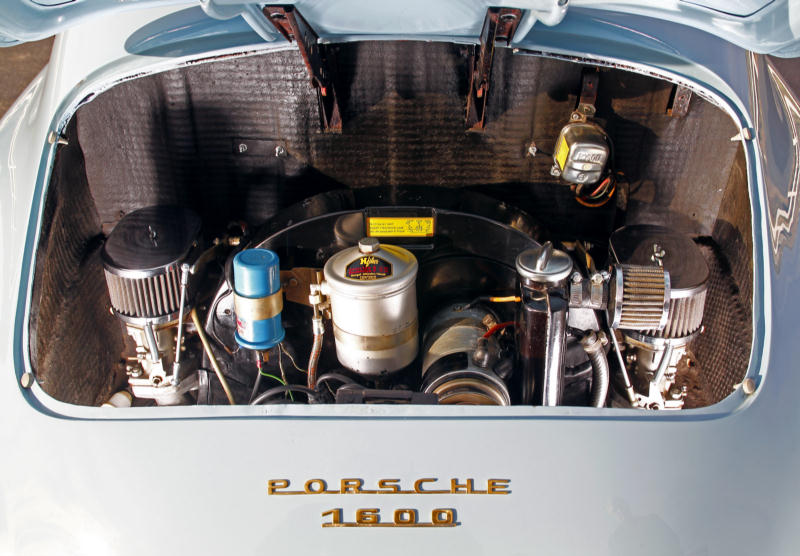
Upgrades:
The most obvious upgrades are the 912 engine, Weber carburetors with
K & N air filters, sport muffler and the 12 volt electric system. In
addition, we replaced the vinyl front seats with leather, installed one of
Al Zim's dual brake master cylinders, and replaced the 1960's era VW transistor
radio with a period correct Blaupunkt. In the car when we purchased was the
complete paperwork for a Blaupunkt ExportSuper. Although I search the internet
every few months, I have not been able to find one of these. Although I have
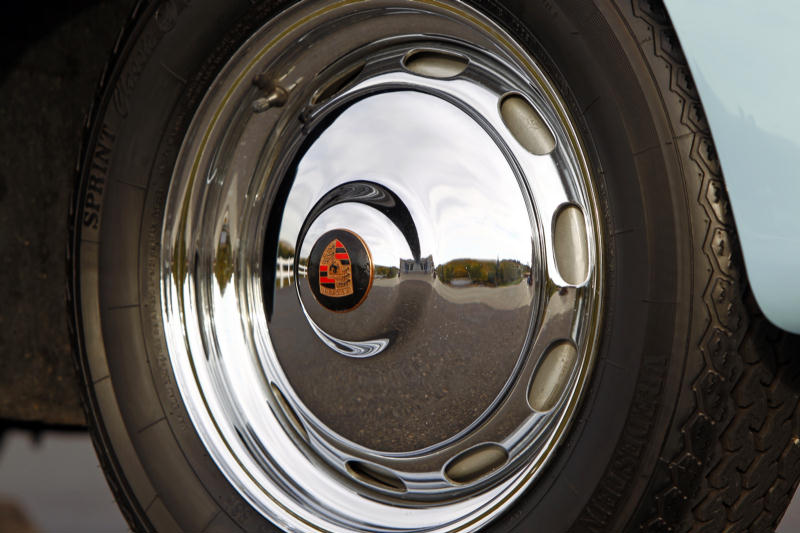
the original wheels, I like the look of chrome. I think I have one of the
last sets of Mangels made in Brazil, ordered from Stoddard in 2007. After
reading all the issues related to rust on these wheels, I thoroughly painted
the backs and insides with clear coat and keep the front surfaces sealed
with a product used by the local bike shop on chrome, as the only time I
expect this car to see water is during washing.I also striped and repainted
the front and back of the spare wheel. This was a mistake, as I did this
before mounting one of the five new Vredestein Classic Sport tires. I can't
remember if this wheel was ever on the ground. There was a reason this wheel
was the spare. It was out of round and impossible to balance, so I ended
up having to strip and paint the best of the other four original wheels.
I used an entire can and half of another of Stoddard's wheel paint covering
two wheels, bumper guard brackets, wipers and one headlight
assembly.
![]()
Future Projects:
We still have a few things to do, including installation of a heavier
sway bar and re-chroming the super hubcaps. The quarter window frames, although
good for a driver, also need rechroming, as well as the seat recliners and
luggage rack. The dash switch bezels could also be replaced in the future
and the horn button is glazed and has slight cracks. The Webers seem really
touchy at Wyoming altitudes, so may eventually try to find the appropriate
Solexs. I would also like to have the tachometer converted to electric. I
have the correct oil pump cover in storage for this conversion. The car is
not over restored and certain parts, like the quarter window frames have
a "patina of age", in other words, will rechrome when I live in a place closer
to a good plating shop. Still, the car gets lots of attention when we drive
to the local Starbucks. It is rare that we don't get comments, although I
don't know how much I appreciate it when people call it "cute" or ask if
it is a Carmen Ghia. Of course, it is impossible to ever really be done working
on these classic cars.
![]()
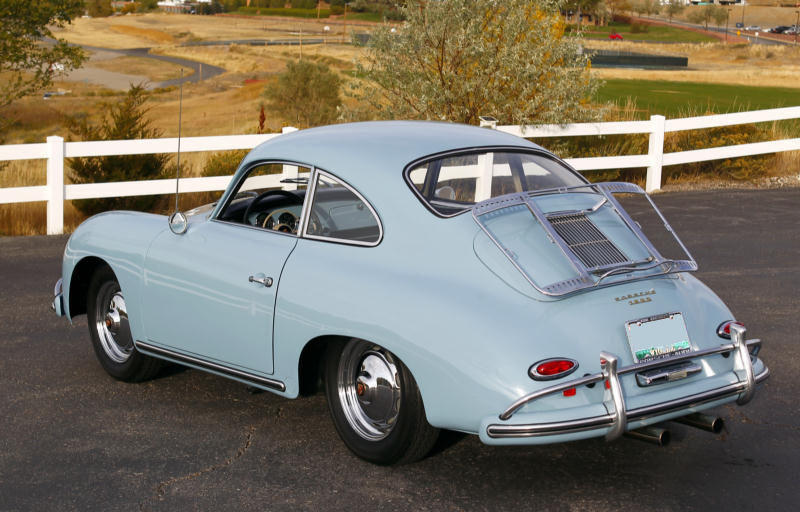
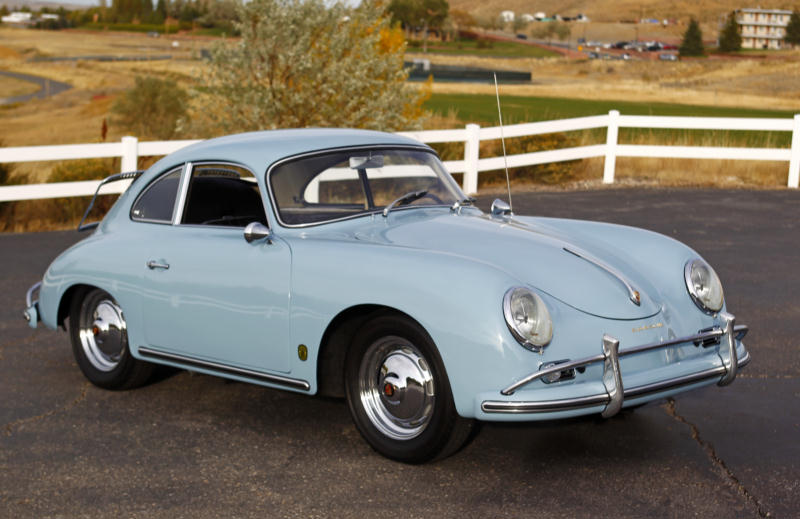
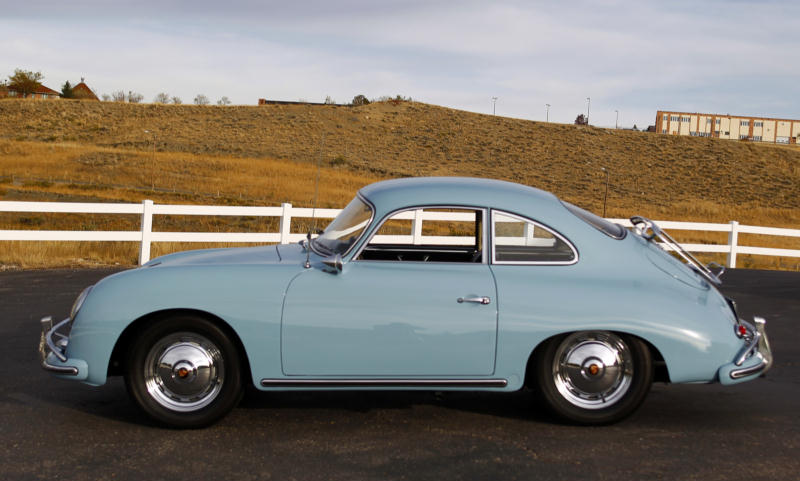
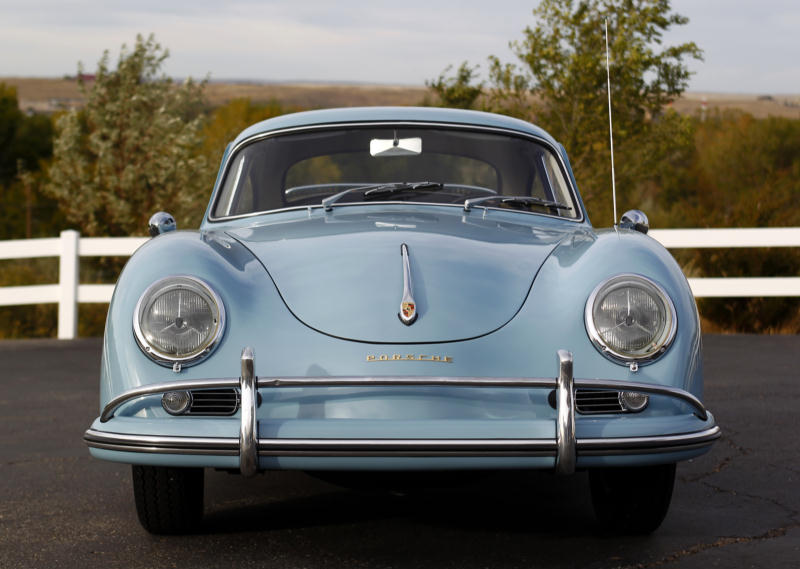
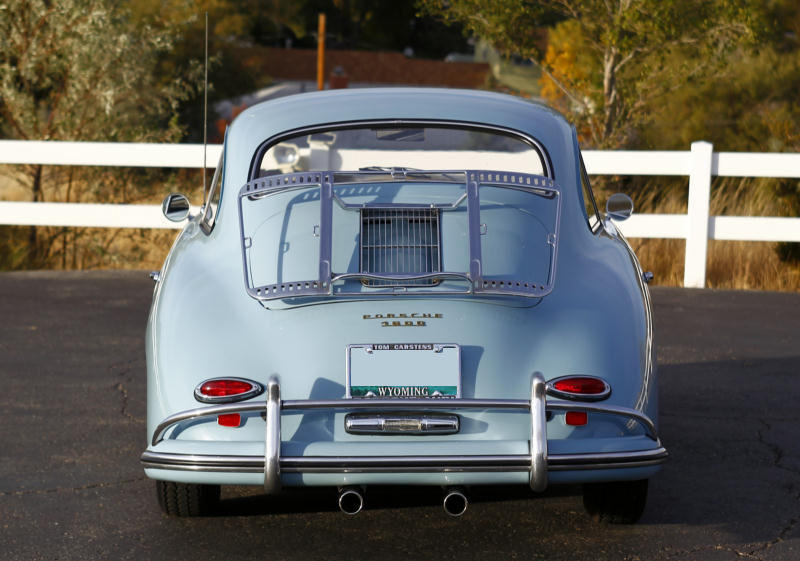
The Completed Project:
 |
|
|
 |
 |
 |
 |
 |
 |
 |
 |
 |
 |
 |
 |
You'd be smiling too, if you'd just been restored! |
![]()
Final Thoughts:
The engine and trunk tar paper insulation was not perfect, but in good shape though faded. I should have refreshed this before the bodywork and painting. I found a Mothers product "Back to Black" at a local auto parts store and decided to try it on the insulation, although it is designed for plastic. Looks OK after several coats, not brand new fresh, but definitely reduces the faded look. Time will tell if it will hold up.
The biggest challenge now is to keep the appearance of the car at an acceptable level. Before the restoration, we pretty much ignored the car. With the wind and dust in the high-desert plains of Central Wyoming and the hard water, the car requires constant washing. I also have to pay special attention to drying the car, as the hard water leaves nasty water spots with the potential of leaving permanent marks in the paint and bright work. At least there is very little humidity.
My two children are fighting over who gets the car when we die, not anytime soon I hope! Both started their driving careers in the 356. My daughter may have the edge as I locked her in the car in a car seat when she was six months old in front of a biker bar in South Tacoma. She constantly reminds me of this, and that our son is 6' 4'', although he seems to have adequate room in the car. She loves the car and has fond memories of the car growing up when the 356 was one of our regular family cars. May have to buy or restore another one! All in all, it's been a great project!
Please email if you have questions or comments.
![]()
Walt and Becky Nolte
nolte82601@gmail.com
1959 356-A Coupe
Serial Number #105321
Edited and Website Design
by Charlie White
derwhite@aol.com
![]()
"DerWhite's
356
Porsche
Sales
& Technical
Literature......the
Book!"
Size 8.5 x 11 inches,
Hardbound, 356 Pages,
All
Color!
![]() Click
here for more details about
DerWhite's
New Book!
Click
here for more details about
DerWhite's
New Book!
Research and Website creation by:
Charlie
White
Scottsdale, Arizona
USA
Email:
derwhite@aol.com
Copyright@2010, 2014 DerWhite
Productions, Phoenix, Arizona
USA
and Walt and Becky
Nolte.
Website completed 10/30/10,
updated
1/18/14.